
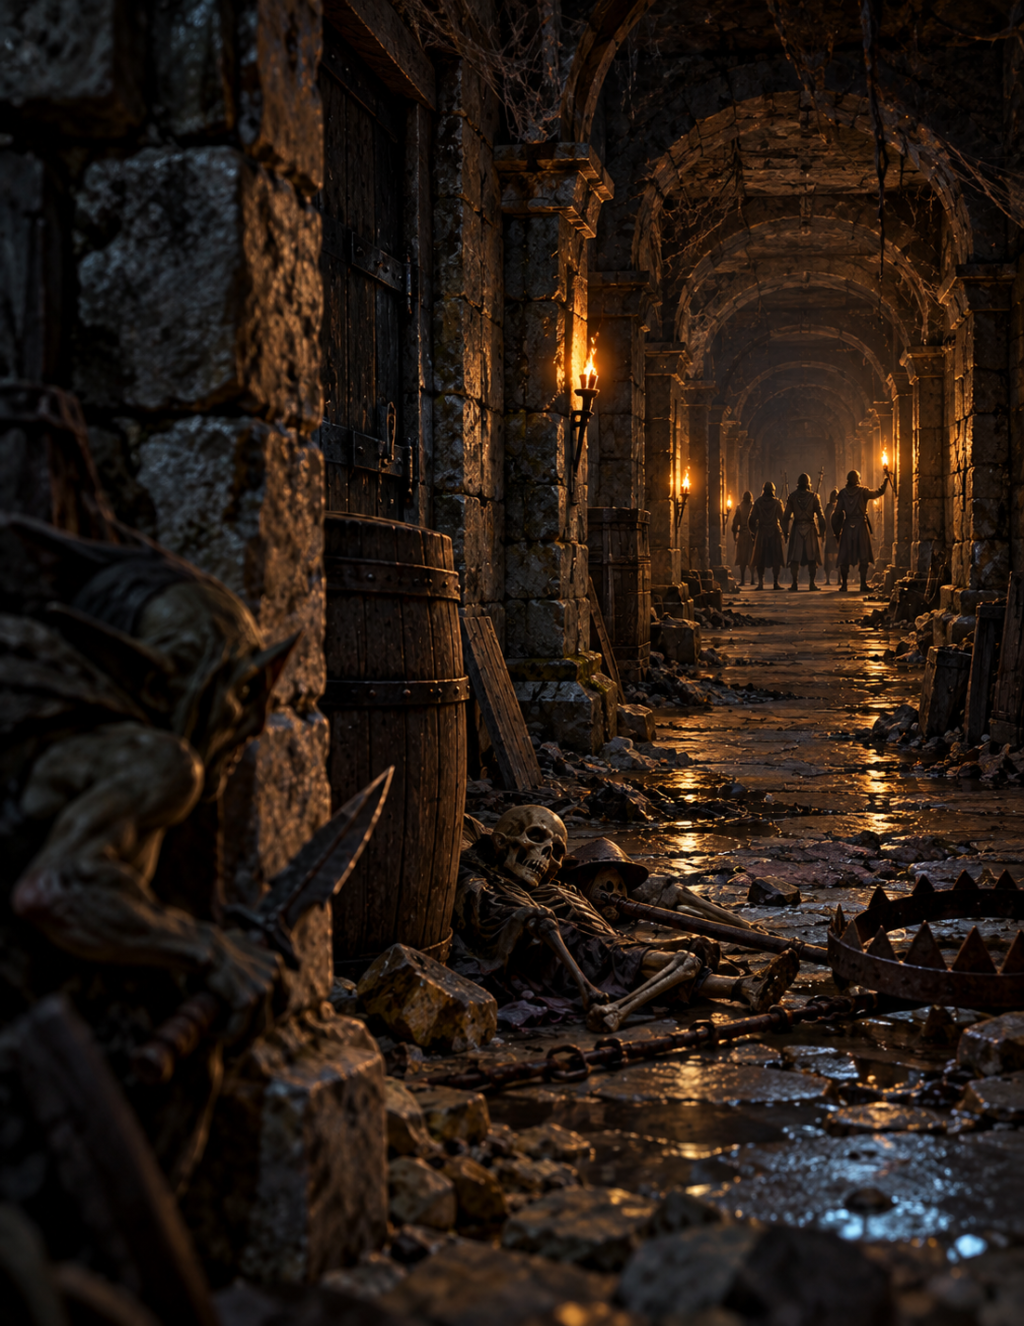
Appendix D provides a small but fully playable corner of Sylva: the town of Willowcreek, the adventurers’ tavern called Rusty’s, the nearby ruins of Greywatch, and two Missions designed to begin a new Kingsmark campaign. The material presented here is intentionally incomplete. Willowcreek contains many more streets, households, businesses, institutions, stories, and people than appear in these pages. 🍺The Tavern and 🧭The World Book develop the town and surrounding region in much greater detail. Everything established here, however, is part of the setting and players are encouraged to create content that is totally different from “official” locations, nations, cultures, peoples and factions.
This adventure assumes the GM understands how to call for Tests, establish Realism Target Numbers, portray NPCs, resolve Dialog and Action Scenes, and respond when players attempt something the adventure did not anticipate. What it provides is a ready place, ready people, ready problems, and enough uncertainty that the adventure remains alive in play.
Greywatch is deliberately variable. Before play, the GM makes several 1d12 rolls establishing its present condition: the circumstances of the first Mission, the objective of the second, available entrances and secret routes, current occupants, active traps and hazards, and hidden treasure. The physical dungeon remains recognizable, but its contents do not. A player may read this appendix and know that a secret passage could exist behind a particular wall without knowing whether it is accessible in this expedition, what waits beyond it, or whether another route would have been safer.
After playing through the adventures, a group should understand how 👑Kingsmark brings Contracts, exploration, Dialog Scenes, Action Scenes, light, Surprise, traps, hidden routes, creature behavior, combat, Trauma, healing, magic, treasure, retreat, XP, Favor, and player decisions together during an ordinary heroic-fantasy adventure.
🌳🏘🏡🏘🌳Willowcreek
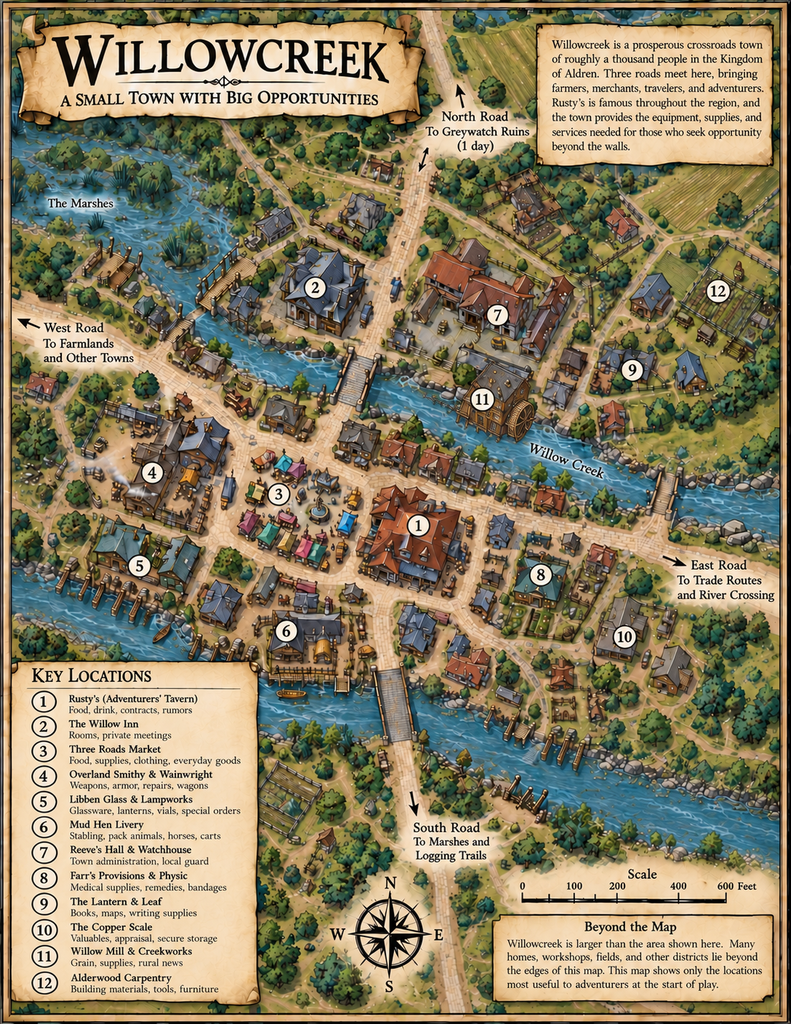
Willowcreek is a prosperous small city of roughly 10,000 permanent residents in the Kingdom of Aldren. It stands where three roads converge near a reliable crossing of Willow Creek, surrounded by farms, grazing land, wet meadows, patches of woodland, and broad marshy country. Heavy rain can turn the lower roads to mud within hours. Frogs, marsh birds, insects, and mist belong to the landscape, and travelers quickly learn why local buildings favor raised foundations, deep drainage ditches, stone thresholds, and roofs that throw water well clear of the walls. Local leaders expect Willowcreek to approach fifty thousand residents within the next decade as Rusty’s Adventurers’ Tavern and the expanding glass trade draw an extraordinary influx of adventurers, craftsmen, merchants, laborers, families, and fortune-seekers. New streets, workshops, inns, warehouses, and houses seem to be under construction everywhere. The city feels larger than its population. Farmers come to trade, wagons stop for repairs, merchants transfer goods between roads, drovers water animals, travelers take rooms, and adventurers arrive because they have heard of Rusty’s. On a busy day, a stranger may hear several accents before reaching the market.
Willowcreek has benefited enormously from this traffic, but prosperity has also given it a rougher reputation than many settlements of similar size. Coin attracts gamblers, thieves, swindlers, hired muscle, and people who prefer temporary lodging because somewhere else remembers their names. The town watch is accustomed to trouble without assuming every armed stranger is a criminal. Most residents understand the bargain: outsiders sometimes create problems, but they also buy food, beds, horses, repairs, drink, clothing, medicine, equipment, and local labor. Common Humans form most of Willowcreek’s permanent population, but constant travel has made variety ordinary. Dwarves, Elves, Qetanim, Human Giants, foreigners, merchants, pilgrims, and adventurers attract far less attention here than they would in an isolated farming village.
🍺Rusty’s (1)
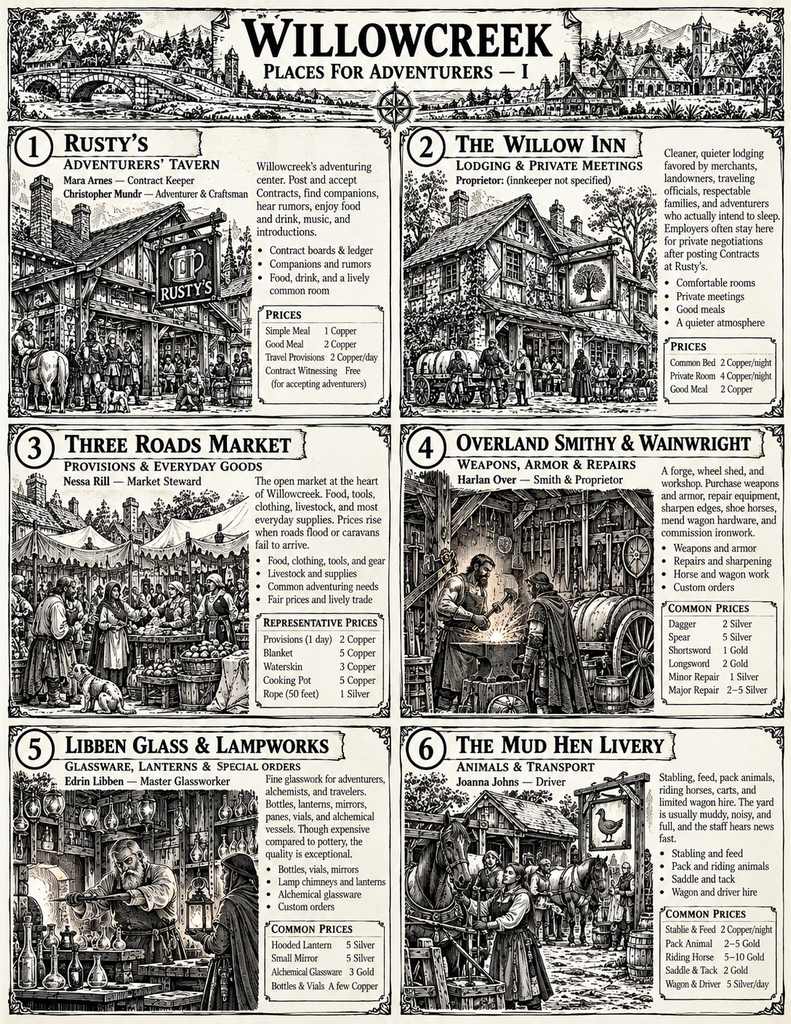
Rusty’s is the establishment that placed Willowcreek on the adventuring map. Its royal adventurers’ house badge allows Contracts to be advertised, witnessed, and recorded through the tavern. One board carries paid work; another carries notices from adventurers seeking companions. The enormous common room also provides food, drink, music, rumor, introductions, arguments, celebrations, and the occasional lesson delivered by an older adventurer to somebody who has not yet learned how dangerous the profession can be. Rusty’s draws enough outside money that even townspeople who dislike adventurers recognize what the tavern has done for Willowcreek. Mara Arnes works here managing the Contract boards and ledger, while Christopher Mundr can often be found at a corner table drinking, sketching, making copper jewelry, reading, writing, or talking with whoever happens by. A simple meal costs 1 Copper, a good meal 2 Copper, and one day of travel provisions 2 Copper; Rusty’s also witnesses and records ordinary adventuring Contracts without charging the adventurers who accept them.
💤🛏The Willow Inn (2)
The Willow Inn is quieter, cleaner, and less interested in becoming part of anyone’s legend. Merchants, landowners, traveling officials, respectable families, and adventurers—who actually intend to sleep—use its rooms. Employers who post Contracts at Rusty’s frequently lodge here, making the inn a useful place for private negotiations after a party has expressed interest in a notice. A bed in common lodging costs 2 Copper per night, a modest private room 4 Copper, and a good meal 2 Copper.
⚖Three Roads Market (3)
The open market occupies the broadest intersection near the center of town. Permanent stalls and temporary carts sell bread, cheese, smoked fish, meat, vegetables, salt, candles, lamp oil, cordage, sacks, blankets, clothing, cookware, cheap knives, buckets, livestock feed, and most ordinary supplies. Prices rise when roads flood or caravans fail to arrive. Nessa Rill serves as the market steward and can usually be found somewhere among the stalls settling disputes, assigning spaces, or keeping an eye on trade. Common adventuring necessities are readily available: one day of provisions 2 Copper, a blanket 5 Copper, a waterskin 3 Copper, a cooking pot 5 Copper, or 50 feet of rope 1 Silver.
⚔🛡Overland Smithy & Wainwright (4)
The Overland yard combines a forge, wheel shed, timber rack, and cramped shop front. Adventurers can purchase or order ordinary metal weapons, repair armor, sharpen damaged edges, replace buckles and fittings, shoe horses, mend wagon hardware, and commission simple ironwork. Specialized or unusually fine equipment may require time, materials, or another craftsman rather than appearing conveniently upon demand. Harlan Over owns and works the smithy and is usually found at the forge, inspecting equipment, or arguing about how long proper craftsmanship actually takes. Common weapons include daggers for 2 Silver, spears for 5 Silver, shortswords for 1 Gold, and longswords for 2 Gold; routine sharpening or minor metal repair costs 1 Silver, while substantial weapon, armor, or wagon-hardware repairs normally cost 2–5 Silver.
🪟Libben Glass & Lampworks (5)
Willowcreek has developed a modest reputation for useful glasswork. Libben’s produces bottles, lamp chimneys, panes, mirrors, vials, simple alchemical vessels, and lanterns fitted by nearby smiths. Though expensive compared with pottery or horn, traveling merchants carry enough away to keep the workshop unusually busy for a settlement this size. Edrin Libben owns the workshop and spends most working hours overseeing the furnaces, shaping glass, and dealing with customers. Adventurers can buy a hooded lantern for 5 Silver, a small mirror for 5 Silver, or specialist alchemical glassware for 3 Gold; ordinary bottles and vials cost only a few Copper each.
🐴The Mud Hen Livery (6)
Named for the black marsh birds common around Willowcreek’s wetter reaches, the Mud Hen provides stabling, feed, pack animals, riding horses, carts, and limited wagon hire. Its yard is usually muddy, noisy, and full, and returning adventurers sometimes discover the staff heard about their latest disaster before Rusty’s did. Joanna Johns works here as a hired driver and is often preparing a wagon, tending horses, waiting for passengers, or returning from a nearby journey. Stabling and feed cost 2 Copper per animal per night, pack animals 2–5 Gold, riding horses 5–10 Gold, saddle and tack 2 Gold, and local wagon-and-driver hire 5 Silver per day.
🏛Reeve’s Hall & Watchhouse (7)
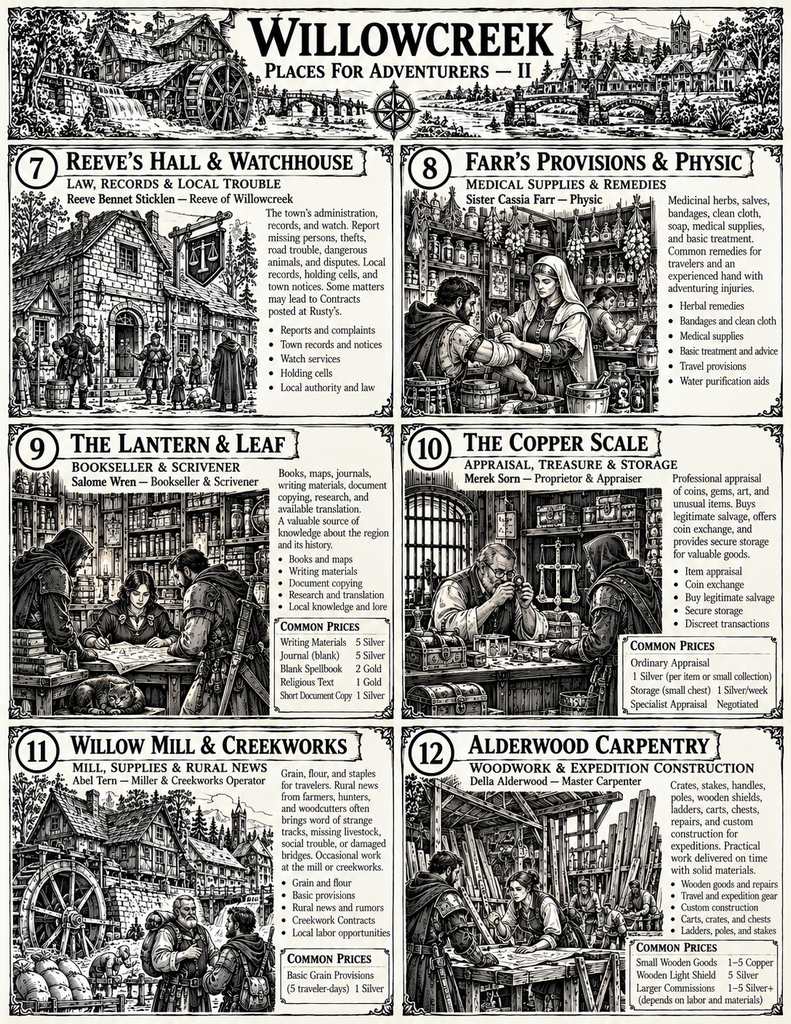
This low stone-and-timber building contains the reeve’s office, local records, a meeting chamber, watch room, and two holding cells. Missing persons, thefts, road trouble, violent disputes, dangerous animals, and threats to town may produce notices that reach Rusty’s. The watch protects Willowcreek but is neither large enough nor intended to explore every countryside ruin. Reeve Bennet Sticklen works here reviewing complaints, records, expenditures, and whatever new problem Willowcreek places before him. Reporting crimes, missing persons, hazards, or threats costs nothing; a certified copy of an ordinary public record costs 1 Silver, while an extended records search costs 2 Silver when clerical labor is required.
🌿🤕🧪Farr’s Provisions & Physic (8)
Farr’s sells bandages, clean cloth, medicinal herbs, soap, medical spirits, basic remedies, travel provisions, and several unpleasant but useful preparations. Serious injuries still require treatment and time, but adventurers can replace consumed medical supplies here before leaving town without searching through several unrelated merchants. Sister Cassia Farr runs the shop, treating patients, preparing remedies, supervising apprentices, and replacing adventurers’ supplies.
📚🪶The Lantern & Leaf (9)
The Lantern & Leaf is a narrow bookseller’s and scrivener’s shop crowded with shelves, maps, ink, parchment, ledgers, and books in several languages. Its practical stock includes local histories, religious works, travelers’ accounts, herbals, copied songs, legal forms, arithmetic primers, and secondhand books bought from estates or passing merchants. Adventurers can buy journals and writing supplies, have documents copied, commission available translations, or pay to search old records and maps. Travelers short of coin sometimes sell books here, so unexpected material appears, though rare volumes are never guaranteed. Salome Wren keeps the shop and is usually copying documents, researching records, or helping customers find written information. Writing materials cost 5 Silver, a journal 5 Silver, a blank spellbook 2 Gold, and an ordinary religious text about 1 Gold; a short copied or written document costs 1 Silver, with long, damaged, rare, or foreign-language work negotiated separately.
🪙⚖The Copper Scale (10)
The Copper Scale buys, sells, appraises, and stores valuables. Its counters see old coins, jewelry, silverware, trade bars, gemstones, curiosities, inherited objects, and portable treasure recovered by adventurers. The proprietor exchanges common coinage, identifies ordinary precious metals and workmanship, and offers secure storage for a modest fee. Objects requiring specialized historical, magical, religious, or artistic knowledge may need expert appraisal elsewhere. The Scale also purchases legitimate salvage, although its owner expects enough profit to justify resale. Adventurers carrying an ancient coin, jeweled object, or cumbersome piece of valuable salvage therefore have somewhere sensible to begin. The shop keeps careful records and wants nothing to do with obviously stolen property. Merek Sorn owns the shop and can usually be found behind its counters examining coins, jewelry, salvage, or other valuables brought in for appraisal. Ordinary appraisal of a coin, jewel, precious-metal object, or piece of salvage costs 1 Silver per item or small collection, while secure storage costs 1 Silver per week for valuables fitting within a small locked chest; unusually difficult appraisal requires a specialist and is negotiated separately.
🌾⚙Willow Mill & Creekworks (11)
A water-driven mill stands downstream from Willowcreek, where a controlled channel diverts part of Willow Creek beneath a broad wooden wheel. Farmers bring grain from the surrounding countryside, while adjoining sheds store flour, sacks, timber, rope, tools, and spare millstones. The mill also serves as an informal center for rural news. Farmers, hunters, laborers, wagoners, and drainage crews bring reports from beyond town: strange tracks, missing livestock, washed-out bridges, damaged roads, abandoned wagons, or unusual lights may be discussed here before word reaches Rusty’s. Heavy rain can also turn the creek into a local problem. Flooded channels, broken gates, jammed machinery, and damaged embankments make the Creekworks a natural source of smaller Contracts as well as useful information. Abel Tern operates the mill and Creekworks and is frequently found inspecting machinery, waterways, grain deliveries, or whatever problem the latest rain has created. Travelers can buy inexpensive grain, flour, or similar staples here; 1 Silver purchases roughly five traveler-days of basic grain-based provisions, while larger sacks and bulk orders are priced proportionately. This follows the ordinary 2 Copper per day provisions benchmark.
🪚🪵Alderwood Carpentry (12)
Alderwood Carpentry is a busy workshop specializing in practical wooden goods rather than decorative luxury. Its yard is stacked with seasoned planks, beams, wagon boards, handles, crates, doors, shutters, furniture parts, ladders, and repair timber. Adventurers can purchase or commission chests, poles, stakes, shields of suitable construction, replacement handles, simple furniture, barricade materials, and other ordinary wooden equipment. The carpenters also repair damaged carts, doors, pack frames, and wooden structures when the work does not require a dedicated wainwright. Because the shop buys usable timber and reclaimed wood, adventurers occasionally bring back salvage from abandoned buildings or ruins. Large commissions require time, labor, and materials rather than appearing immediately, making Alderwood particularly useful when a party intends to prepare for a longer expedition or reinforce a location. Della Alderwood owns the workshop and can normally be found cutting timber, supervising commissions, inspecting reclaimed wood, or working alongside customers planning unusual construction. Simple crates, stakes, handles, poles, and small wooden repairs generally cost 1–5 Copper, a serviceable wooden light shield costs 5 Silver, and larger commissioned work such as ladders, barricades, heavy chests, or structural repairs normally begins around 1–5 Silver and rises with material and labor.
People of Willowcreek
Mara Arnes — Contract Keeper at Rusty’s
Mara manages the Contract boards and ledger at Rusty’s (1) with the practiced patience of someone who has watched hundreds of strangers decide they are adventurers. She explains procedure, identifies who posted a notice, witnesses agreements, and remembers which employers have paid reliably in the past. She does not choose Contracts for parties or guarantee that an employer is telling the whole truth. Mara has an excellent memory for names and an even better memory for unpaid fees. With Willowcreek growing so quickly, she now sees new faces almost every day and has become an informal first point of contact for adventurers, employers, merchants, and newcomers trying to understand how work gets done in the city. She generally likes Reeve Sticklen, although the two sometimes disagree over whether a dangerous local problem belongs on the Contract board or should be handled by the watch.
Christopher Mundr — Legendary Monster Hunter
Christopher Mundr is a ⭐Level 5 legendary Monster Hunter with long dreadlocks, a quiet step, quick hands, and a habit of appearing where people did not notice him enter. He can follow tracks through wilderness, climb where others look for doors, disappear into shadow, and has spent enough years hunting dangerous creatures to know that surviving one often depends upon approaching it before it knows you are there. When he is not adventuring, Christopher can usually be found at a corner table in Rusty’s (1) drinking, sketching, making intricate copper jewelry, reading, writing, talking with whoever passes his table, and inevitably steering the conversation toward monsters, spirits, strange metaphysics, or the hidden nature of the world. He seems to know everyone and is remarkably successful with women; across the years, at any given time, you’ll either find him deeply in love or heartbroken and drinking far too much over a woman that probably isn’t worth the sorrow. An eight-rayed Chaos Star is tattooed upon his ankle, copied from a symbol carved into the lair of one of the first unnatural creatures he ever hunted. Christopher practices no Chaos Magick himself and never gives the same explanation twice for why he kept the symbol—sometimes calling it a warning, sometimes a joke, and sometimes refusing to discuss it at all. Beneath the charisma and legend lies a wound that never entirely healed: as a small child, Christopher accidentally killed his closest friend during an archery accident while playing in the forest. Even after surviving horrors that would break lesser adventurers, the memory of her death remains the thing he cannot defeat. Out of the Twelve Horrors, Mundr has permanent 🧠Unstable Mental Trauma from category #9 🪞 Guilt and Self-Betrayal. He can be hired for 10 gold per day.
Reeve Bennet Sticklen — Reeve of Willowcreek
Sticklen works from Reeve’s Hall & Watchhouse (7) and possesses the weary competence of a man who spends most days deciding which problems actually justify Willowcreek’s limited money and manpower. He can issue Contracts involving roads, missing residents, public hazards, criminal activity, dangerous creatures, and threats near town. He prefers using adventurers when a problem requires a small capable party rather than sending half the watch into the countryside. Willowcreek’s rapid expansion has made that judgment increasingly important, as new roads, construction sites, outer settlements, drainage works, cellars, tunnels, and abandoned structures constantly create problems the watch was never large enough to handle alone. Sticklen appreciates what Rusty’s (1) has done for Willowcreek’s economy but dislikes the disorder that sometimes follows its clientele, a contradiction Mara occasionally enjoys reminding him about.
Joanna Johns — Hired Driver and Single Mother
Joanna is a short, dark-skinned woman, about 5’3″, heavyset, warm, cheerful, and far more likely to greet someone with a smile than a complaint. She is also an avid reader whenever work and motherhood allow it. Joanna is a single mother raising Annie, her five-year-old redheaded daughter. The much lighter complexion of her daughter suggests mixed ancestry or adoption, but most people are too polite to ask and simply know her as Joanna’s daughter. Joanna earns their living as a hired driver through The Mud Hen Livery (6), carrying passengers, luggage, messages, and small loads around Willowcreek and to nearby farms and settlements by horse and wagon. At the beginning of the Greywatch story, Annie has been kidnapped and clues point toward the ruins. Joanna has little money and no influence, but she will spend what she has to get her daughter back. She trusts Sister Cassia and knows Mara well enough to ask her for help finding adventurers. Joanna saw Annie being carried away but was unable to reach her before the kidnappers disappeared into the countryside. The experience left her with 🧠Impaired Mental Trauma from category #11 🔒 Isolation, Abandonment, and Imprisonment, centered upon the helpless terror of being separated from her daughter and knowing Annie is somewhere she cannot reach.
Harlan Over — Master Smith
Harlan owns Overland Smithy & Wainwright (4) and judges adventurers largely by what they do to their equipment. He is broad, scarred by years of forge work, and unimpressed by decorative weapons that sacrifice usefulness. Harlan repairs damaged arms and armor, buys legitimate metal salvage, and can usually tell whether an old piece of iron is worthless scrap, sound workmanship, or something worth showing to a specialist. Willowcreek’s growth has kept his forge busier than ever, with construction crews, wagoners, guards, and adventurers all competing for his time. He works regularly with Alderwood Carpentry and respects anyone who understands that good work takes time. Harlan distrusts customers who arrive with valuable metal but become evasive when asked where it came from.
Sister Cassia Farr — Physicker
Cassia runs Farr’s Provisions & Physic (8) with two apprentices. “Sister” is an old local courtesy rather than proof of membership in any particular religious order. She treats wounds, sets bones, sells medical supplies, and has enough experience with adventurers to ask what actually happened rather than accepting “I fell” as an explanation for three blade wounds. The city’s rapid expansion has brought her everything from construction injuries and wagon accidents to strange wounds carried back from ruins beyond Willowcreek. Cassia is compassionate, practical, and quite willing to charge people who can afford to pay. She treats Joanna Johns and Annie kindly, has little tolerance for violent drunks, and sometimes clashes with adventurers who expect a bottle of medicine to replace rest and proper treatment.
Nessa Rill — Market Steward
Nessa supervises stall assignments, resolves minor disputes, and keeps commerce moving through Three Roads Market (3). She knows which caravans are overdue, what goods have suddenly become expensive, which farmers have surplus produce, and which merchants are quietly desperate to sell before leaving town. With new residents arriving constantly, she also keeps track of temporary sellers, new tradesmen, and unfamiliar goods that appear almost overnight. Nessa is friendly but difficult to deceive about ordinary trade. She has an ongoing disagreement with Merek Sorn of the Copper Scale, whom she believes profits too enthusiastically whenever shortages or frightened sellers create an opportunity. Merek insists that Nessa simply dislikes anyone who understands arithmetic better than she does.
Edrin Libben — Master Glassworker
Edrin owns Libben Glass & Lampworks (5) and is responsible for much of Willowcreek’s modest reputation for useful glasswork. He is patient with molten glass and considerably less patient with people. Broken bottles, cracked lamp chimneys, ruined panes, and customers asking for complicated work “by tomorrow morning” all irritate him in roughly equal measure. Edrin regularly commissions metal fittings from Harlan Over and complains about Harlan almost as often as he praises his work. He will pay well for unusual minerals, pigments, old glassmaking tools, or intact examples of ancient glass recovered from ruins.
Salome Wren — Bookseller and Scrivener
Salome keeps The Lantern & Leaf (9) and seems capable of remembering where every book, map, ledger, and loose scrap of parchment in the crowded shop belongs. She copies documents, writes letters for people who cannot, buys old books, and occasionally translates material when she knows the language or can locate someone who does. Salome is especially interested in old maps and records recovered from abandoned places. She gets along well with Mara, who occasionally sends confused employers to her for properly written notices, but has a longstanding irritation with Reeve Sticklen because he will not allow her unrestricted access to Willowcreek’s older official records.
Merek Sorn — Appraiser
Merek owns The Copper Scale (10) and makes his living knowing the difference between something that looks valuable and something somebody will actually pay for. He appraises coins, jewelry, gemstones, precious metals, portable antiquities, and ordinary treasure, while sending truly specialized objects elsewhere. Merek keeps meticulous records and refuses obviously stolen property, partly from principle and partly because stolen goods are bad business. He and Salome Wren frequently disagree over historical objects: Salome wants important pieces preserved and studied, while Merek believes ownership usually belongs to whoever lawfully possesses them. Both think the other confuses personal preference with common sense.
Abel Tern — Miller and Creekkeeper
Abel operates Willow Mill & Creekworks (11) and knows the surrounding farms, drainage channels, embankments, and waterways better than almost anyone in Willowcreek. Farmers bring him grain but also news, complaints, rumors, and observations from miles around. Abel therefore hears about missing livestock, strange tracks, damaged bridges, lights in abandoned places, and unfamiliar travelers long before many stories reach town. He has repeatedly argued with Reeve Sticklen over how much money Willowcreek should spend maintaining drainage works. When heavy rain threatens the lower roads, Abel considers himself proven right yet again.
Della Alderwood — Carpenter
Della owns Alderwood Carpentry (12) and produces the practical wooden things Willowcreek constantly consumes: doors, shutters, crates, handles, ladders, furniture, repair timber, and structural pieces. She works closely with Harlan Over whenever a job requires both wood and iron, and the two have developed the comfortable habit of insulting one another’s trades while recommending each other to customers. Della buys sound reclaimed timber from demolition and salvage work but refuses rotten beams no matter how ancient or historically interesting someone claims they are. Adventurers planning to reinforce a ruin, repair a damaged structure, build unusual equipment, or transport something enormous may discover that Della is considerably more useful than a weapons merchant.
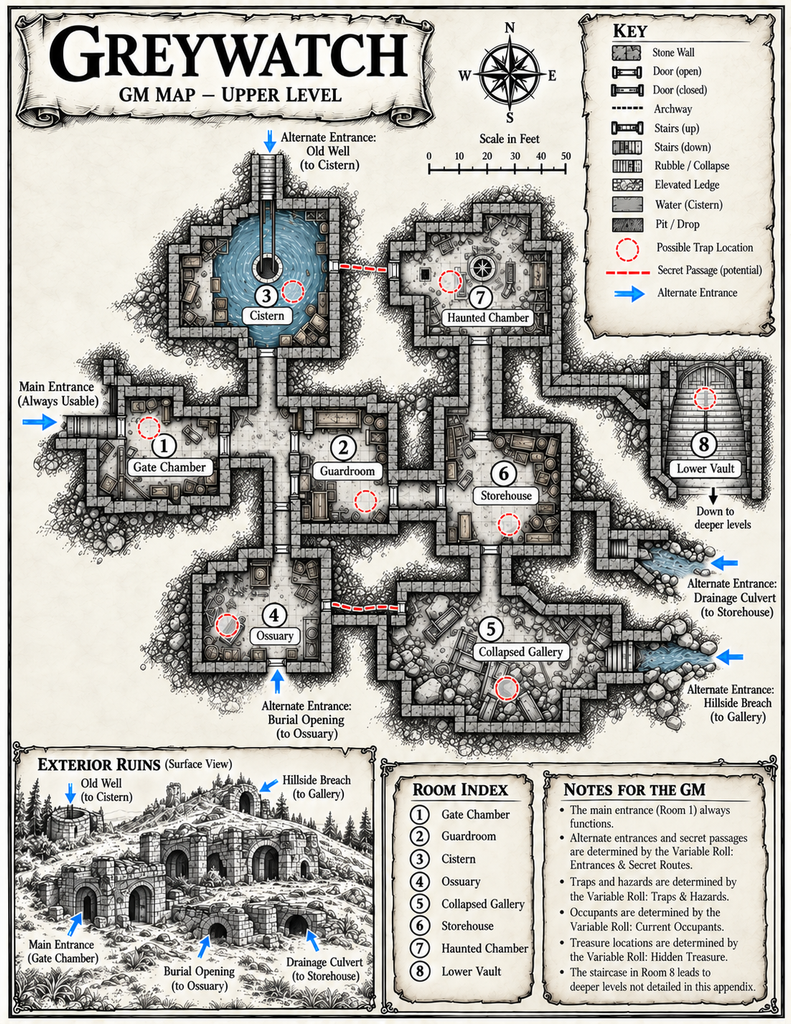
🏰Greywatch
Greywatch stands about an hour northwest of Willowcreek upon slightly raised ground overlooking the old road and surrounding marsh country. From a distance it appears to be little more than the remains of a fortified watch-post: broken stone walls, a roofless tower, weeds growing through an abandoned yard, and masonry scavenged over generations for nearby farms. In wet weather, mist gathers around the higher ground and partially hides the ruin from travelers approaching along the road. The visible ruins are deceptive.
Greywatch was constructed upon foundations already ancient when the watch-post was built. Its builders reused walls, stairs, drainage works, burial chambers, and underground rooms whose original purpose had largely been forgotten even while the fortress remained occupied. Some passages descend farther than the surviving surface structures would suggest, and several walls appear to belong to entirely different periods of construction.
Later garrisons repaired whatever remained useful and sealed whatever did not. When changing roads made the post increasingly unnecessary, maintenance declined. Local stories claim one of its final commanders continued collecting money intended for repairs and wages while allowing the place to decay around the men responsible for defending it. Whether true or not, Greywatch was eventually abandoned.
Farmers later removed timber and workable stone from the surface ruins, but few people willingly entered the underground chambers. Flooding, collapses, vermin, stories of hidden graves, and occasional Goblin sightings discouraged serious exploration. Even those who ventured inside rarely went far enough to agree on how large the buried complex actually is. Recent erosion and structural collapse have reopened passages that were previously inaccessible. Scavengers have noticed. So have other things.
What People Say About Greywatch
The following stories circulate in Willowcreek. Some are true, some are distorted, and some depend upon the Greywatch variables rolled by the Game Master.
- Old people insist that Greywatch possesses more than one entrance, although nobody agrees where the others are.
- Children are warned that Goblins once carried people away from the surrounding farms and did terrible things to children they captured.
- Someone supposedly found old silver beneath Greywatch years ago and refused to reveal exactly where.
- Livestock sometimes become nervous near the western side of the hill. Dogs and horses often react before their handlers notice anything unusual, and someone experienced with animals may be able to distinguish fear of a predator from fear of something they cannot easily sense.
- The old well is said to reach considerably deeper than the surface ruins should require.
- Farmers occasionally see lights moving among the ruins after midnight.
- Greywatch contains graves older than the fortress itself.
- An old Willowcreek marching song mentions “water beneath the watch and a door where no door stands.” Most people regard the line as meaningless, although local musicians and storytellers have preserved it for generations.
The Game Master should not explain which stories are correct. Discovery is part of the adventure.
The Changing Dungeon
Before the first Greywatch Mission, roll once on each table and record the results. These establish Greywatch’s present condition and are not repeated upon each entry unless events substantially change or significant game-world time passes. The Main Gate remains usable; Mission One overrides conflicting Current Occupants results.
1d12 — Mission One: What Happened to Annie Johns?
- Goblin Captive: Annie is tied up in the Guardroom (2) where the Goblins have been keeping her. The presence of enemies depends upon what 1d12 says about “Current Occupants.”
- Left Behind: The Goblins are in the dungeon but they left Annie bound in the Gate Chamber (1) when something deeper inside Greywatch demanded their immediate attention. She has been alone for hours and is frightened but physically unharmed.
- Spider Attack: The Goblins carried Annie as far as the Cistern (3) before encountering a Giant Spider. Several Goblins lie dead nearby. Annie is hiding in a narrow recess where the creature could not easily reach her. Whether the Giant Spider remains depends on “Current Occupants.”
- Failed Rescue: Another small group of adventurers accepted Joanna’s plea before the characters arrived at Rusty’s. They found the kidnappers near the Collapsed Gallery (5), but the fight killed both the adventurers and the Goblins. Annie is now alone nearby, hiding among the ruins and too frightened to leave.
- Locked Away: The Goblins shut Annie inside the Storehouse (6) while they explored, argued, slept, or dealt with another threat elsewhere in Greywatch. The door has been secured from the outside, leaving Annie unable to escape on her own.
- Driven From the Ossuary: The Goblins carried Annie into the Ossuary (4) and disturbed its dead. Skeleton Warriors attacked, forcing the surviving Goblins to flee and abandon their prisoner, though they remain in the dungeon preparing to fight back against the undead. Annie remains tied near the chamber’s entrance while whatever awakened there may still be nearby.
- One Captor Remains: Most of the kidnapping party has been killed or scattered by Greywatch’s dangers. One wounded Goblin remains with Annie in the Guardroom (2), unwilling to abandon its prisoner but increasingly frightened of whatever killed the others.
- Caught in the Webs: A Giant Spider attacked the Goblins in or near the Cistern (3). Annie and several Goblins were caught in its webbing. Some of the Goblins are dead, but Annie is alive and unable to free herself. Whether the Giant Spider is still present depends upon what 1d12 says about “Current Occupants.”
- Separated by Collapse: While moving Annie through Greywatch, the Goblins triggered a partial collapse. Annie is stranded behind fallen masonry while her captors are trapped, scattered, or seeking another route; they remain alive in the dungeon. She hears movement elsewhere but cannot cross the debris alone.
- Hidden During a Fight: The Goblins concealed Annie inside a small compartment or storage recess before confronting another danger. None returned for her. She has remained there because she was told something terrible would happen if she made a sound, and she may need considerable reassurance before revealing herself.
- The Haunted Chamber: The kidnappers carried Annie into the Haunted Chamber (7). The Poltergeist reacted violently to their presence, scattering the Goblins and leaving at least one dead or badly injured. Annie is alive in the chamber, frightened and confused, while the spirit’s present behavior depends upon how the characters approach.
- Abandoned Near the Lower Vault: The Goblins brought Annie deeper into Greywatch than they intended. Something near the Lower Vault (8) frightened or attacked them badly enough that they abandoned her and fled. Annie has crawled into the safest-looking place she could find and remained there, waiting for someone to come for her.
1d12 — Entrances & Secret Routes
The Main Gate always functions. Therefore, in addition to it…
- No additional exterior entrance is presently usable. The ruin offers no easy shortcut.
- The old well reaches the Cistern (3) through a narrow vertical shaft.
- A drainage culvert reaches the Storehouse (6) beneath the outer masonry.
- A collapsed burial opening reaches the Ossuary (4) through broken earth and stone.
- A hillside breach reaches the Collapsed Gallery (5) through a partially exposed wall.
- The well reaches the Cistern (3), and a secret passage connects the Cistern (3) with the Haunted Chamber (7). Both routes are difficult to notice.
- The burial opening reaches the Ossuary (4), and a secret passage connects the Ossuary (4) with the Collapsed Gallery (5). Loose rubble partly conceals both routes.
- The drainage culvert reaches the Storehouse (6), while the hillside breach reaches the Collapsed Gallery (5). Greywatch can be entered from opposite sides.
- The well reaches the Cistern (3), the drainage culvert reaches the Storehouse (6), and a secret passage connects the Cistern (3) with the Haunted Chamber (7). Several unexpected approaches are available.
- The burial opening reaches the Ossuary (4), the hillside breach reaches the Collapsed Gallery (5), and a secret passage connects the Ossuary (4) with the Collapsed Gallery (5). The eastern ruins are unusually porous.
- Three of the four alternate exterior entrances are usable, chosen by the GM, and both internal secret passages exist. Greywatch contains numerous hidden ways through.
- All four alternate exterior entrances and both internal secret passages are accessible. Nearly every part of Greywatch connects.
1d12 — Current Occupants
- 2 Goblins occupy the Guardroom (2); 3 Goblins occupy the Storehouse (6).
- 1 Goblin watches the Gate Chamber (1); 2 Goblins occupy the Guardroom (2); 1 Giant Spider hunts in the Collapsed Gallery (5).
- 1 Giant Spider occupies the Cistern (3); another occupies the Collapsed Gallery (5); 2 Skeleton Warriors remain dormant in the Ossuary (4).
- 3 Goblins occupy the Storehouse (6); 2 Skeleton Warriors remain in the Ossuary (4).
- 2 Goblins occupy the Guardroom (2); 3 Goblins occupy the Storehouse (6); 1 Poltergeist haunts the Haunted Chamber (7).
- 1 Giant Spider occupies the Collapsed Gallery (5); 1 Poltergeist haunts the Haunted Chamber (7).
- 2 Skeleton Warriors remain in the Ossuary (4); 1 Poltergeist haunts the Haunted Chamber (7).
- 2 Goblins occupy the Collapsed Gallery (5) and 3 occupy the Storehouse (6) after driving 1 Giant Spider toward the Cistern (3).
- 2 Goblins occupy the Guardroom (2); 2 Skeleton Warriors remain in the Ossuary (4); 1 Poltergeist haunts the Haunted Chamber (7).
- 1 Giant Spider occupies the Cistern (3) and another occupies the Collapsed Gallery (5); 2 Skeleton Warriors remain in the Ossuary (4); 1 Poltergeist haunts the Haunted Chamber (7).
- No living inhabitants remain; 2 Skeleton Warriors remain in the Ossuary (4) and 1 Poltergeist haunts the Haunted Chamber (7).
- Only 2 Goblins remain in the Storehouse (6). Evidence shows that something recently frightened or drove away other inhabitants.
1d12 — ⚠️Traps & Hazards
- No active traps; only ordinary ruined terrain.
- Tripwire near the Guardroom (2).
- Rotten or Weakened Floor in the Collapsed Gallery (5).
- Concealed Pit in the passage between the Guardroom (2) and Ossuary (4).
- Unstable Masonry or Deadfall inside the Gate Chamber (1).
- Jammed or Unstable Stone Door near the Ossuary (4).
- Tripwire near the Guardroom (2) + Rotten or Weakened Floor in the Collapsed Gallery (5).
- Flooded Footing or Dangerous Cistern Edge in the Cistern (3) + Unstable Stairs descending toward the Lower Vault (8).
- Concealed Pit between the Guardroom (2) and Ossuary (4) + Old Mechanical Trap or Trapped Door protecting the Storehouse (6).
- Unstable Masonry or Deadfall, arranged by Goblins near the Guardroom (2) + Unstable Masonry or Deadfall inside the Gate Chamber (1) + Rotten or Weakened Floor in the Collapsed Gallery (5).
- Old Mechanical Trap or Trapped Door near the Storehouse (6) + Flooded Footing or Dangerous Cistern Edge in the Cistern (3) + Unstable Stairs descending toward the Lower Vault (8).
- Concealed Pit in the passage approaching the Ossuary (4) + Unstable Masonry or Deadfall near the Collapsed Gallery (5) + Old Mechanical Trap or Trapped Door protecting an interior entrance to the Storehouse (6).
⚠️ Resolving Greywatch Hazards
To actively search for one of these dangers, spend 🔴🔴🔴🔴 4 Action Points and roll 1d12 + 🌈Mental Performance PRISM + Cloak & Dagger against the listed discovery Target Number. On a success, the character notices the trap, hazard, concealed mechanism, or other danger if it is reasonably detectable from the character’s position. A high margin of success may reveal additional useful details at the Game Master’s discretion. If another character deliberately concealed the danger, that character’s appropriate concealment result may establish the Target Number instead. Discovering a hazard does not automatically disarm or bypass it; the character must still take whatever action is appropriate to avoid it, warn others, disable it, or exploit it.
This is not a mere Perception Test because Perception represents general awareness and noticing details, while searching for traps requires deliberate, focused examination of the environment and the specialized Cloak & Dagger techniques used to recognize concealment, mechanisms, ambush preparations, and exploitable hazards.
The following are the default consequences when a Greywatch hazard is triggered. Circumstances, preparation, 🟠🟠 Careful Step, appropriate tools, magic, or another reasonable approach may alter the Test or avoid it entirely. Careful Step allows a character to move up to half Walking distance while deliberately attending to dangerous footing and may reduce the Target Number or prevent an otherwise applicable penalty when circumstances justify it.
⚠️ Tripwire — TN 6 to discover. A warning tripwire rings a nearby or distant bell, drops metal objects, breaks glass, or otherwise creates enough noise to alert nearby occupants. A tripwire intended to catch the legs instead requires an Agility Defense Test at TN 7 when triggered. Failure knocks the character Prone, ends the current movement, and may inflict a 🩸Minor 🪨Concussive Wound if the character falls onto stone, rubble, stairs, or another hard or dangerous surface. The noise of the fall may also alert nearby occupants.
⚠️ Rotten or Weakened Floor — TN 6 when deterioration is visible; TN 10 when deliberately concealed beneath boards, rugs, dirt, or scattered debris. When the floor gives way, the character falls approximately 10–15 feet, threatening a 🩸Moderate 🪨Concussive Wound. Make a Falling Defense Test of 1d12 + 🌈Physical Performance PRISM + Infantry Athletics against TN 8. Success reduces the Wound to 🩸Minor; exceeding the TN by 3 or more prevents the Wound entirely. Broken flooring and debris may leave the character in a lower chamber, partially buried, separated from companions, or unable to return by the same route without rope, climbing, or another solution.
⚠️ Concealed Pit — TN 10 to discover. The pit is approximately 15 feet deep with steep stone sides. A character who triggers it falls to the bottom, threatening a 🩸Moderate 🪨Concussive Wound. A conscious character able to react may make a Falling Defense Test of 1d12 + 🌈Physical Performance PRISM + Infantry Athletics against TN 8. Success reduces the Wound to 🩸Minor; exceeding TN 8 by 3 or more prevents the Wound entirely. Climbing out without assistance requires an Infantry Athletics Test at TN 8. A rope, ladder, helping companions, appropriate climbing equipment, magic, or another sensible solution may reduce the difficulty or eliminate the Test entirely. Failure to climb normally means the character makes no progress rather than suffering another Wound, but the delay, noise, separation from companions, and difficulty recovering dropped equipment can become serious problems.
⚠️ Unstable Masonry or Deadfall — TN 7 to recognize when naturally unstable; TN 9 if deliberately arranged as a trap. When triggered, make a Speed Defense Test at TN 8. Success allows the character to escape the heaviest debris but may leave the route partially blocked. Failure inflicts a 🩸Moderate 🪨Concussive Wound and knocks the character Prone. A particularly large collapse may also pin a limb or trap the character beneath debris until companions move the stones, break surrounding material, or otherwise free them. The collapse may permanently block the passage until cleared.
⚠️ Jammed or Unstable Stone Door — TN 7 to recognize the danger before forcing it. If forced without first securing the slab, hinges, or surrounding masonry, make an Agility Defense Test at TN 8. Failure inflicts a 🩸Moderate 🪨Concussive Wound as the stone drops, swings, or shifts violently. The character may also become pinned beneath the door or trapped on one side of it. Moving a fallen stone door afterward may require several characters, leverage, tools, exceptional Strength, or another reasonable method.
⚠️ Flooded Footing or Dangerous Cistern Edge — TN 6 to recognize especially treacherous footing when it is not already obvious. A character moving carelessly along the edge must make an Agility Defense Test at TN 7. Failure sends the character into the Cistern. The fall itself normally causes no Wound unless the character strikes stonework, but carried objects may be dropped or soaked, an extinguished light source may leave the chamber dark, and heavy equipment can make climbing out difficult. Climbing from the water onto the slick stone edge without assistance requires an Infantry Athletics Test at TN 8. A rope, helping hand, ladder, or similar preparation may eliminate the Test.
⚠️ Unstable Stairs — Stairs may appear at an entrance to Greywatch or on a staircase descending toward a lower level. TN 9 to identify dangerous structural failure before placing full weight upon them. If the stairs collapse, make an Agility Defense Test at TN 8. Failure causes a fall of approximately 10–20 feet, threatening a 🩸Moderate 🪨Concussive Wound; use 1d12 + 🌈Physical Performance PRISM + Infantry Athletics against TN 8 as the Falling Defense Test. Success reduces the Wound to 🩸Minor; exceeding the TN by 3 or more prevents the Wound entirely. The collapsed staircase may also destroy the easiest route between levels, forcing the party to climb, lower ropes, construct a temporary crossing, or find another way around.
⚠️ Old Mechanical Trap or Trapped Door — TN 9 to discover. Mechanisms normally governs understanding or disabling it. Typical Greywatch mechanisms include spring-loaded blades, concealed spears, heavy crossbow bolts, weighted striking arms, dropping ironwork, or similar devices built to seriously injure an intruder rather than merely inconvenience one. If triggered, make an Agility Defense Test at TN 9. Failure normally inflicts a 🩸Moderate Wound using 🗡️Blades & Spikes, 🏹Projectiles, or 🪨Concussive Damage according to the mechanism. Particularly heavy devices may instead threaten a 🩸Severe Wound when the physical construction clearly justifies it. Some traps may also lock the door, drop a barrier, jam the mechanism, separate the party, or block the route after activation, leaving the heroes with a problem even if nobody is wounded.
1d12 — Hidden Treasure & Loot
- Abandoned Equipment — Storehouse (6): One useful tool or piece of ordinary adventuring equipment worth 1d12 × 1 Silver.
- Small Silver Cache — Guardroom (2): A concealed purse, box, or loose-stone cache containing 1d12 × 2 Silver.
- Burial Jewelry — Ossuary (4): Old rings, ornaments, clasps, or other grave jewelry worth 1d12 × 4 Silver in total.
- Weapon or Armor Component — Storehouse (6): One serviceable weapon, shield, helmet, armor component, or similar piece of equipment worth 1d12 × 3 Silver.
- Cistern Coin Cache — Cistern (3): Coins concealed beneath loose masonry or upon a shallow submerged ledge totaling 1d12 × 3 Silver.
- Cumbersome Salvage — Collapsed Gallery (5): Old metal fittings, carved stonework, architectural ornament, bronze fixtures, or similar material worth 1d12 × 5 Silver, but heavy or awkward enough that removing it requires deliberate effort.
- Found Old Plan of Greywatch — Storehouse (6): A surviving old floor plan, survey, or military document showing portions of Greywatch as they existed when the site was still in use. It is worth 3 Gold to an appropriate collector, scholar, official, or antiquarian.
- Two Modest Caches: A monetary cache containing 1d12 × 2 Silver in the Guardroom (2) and useful equipment worth 1d12 × 3 Silver in the Storehouse (6).
- Historical Object and Silver Cache: An old historical object in the Ossuary (4) worth 1d12 × 5 Silver, plus a concealed cache of 1d12 × 2 Silver in the Guardroom (2).
- Three Discoveries: A coin cache of 1d12 × 3 Silver near the Cistern (3); useful equipment worth 1d12 × 3 Silver in the Storehouse (6); and an old payroll ledger, repair record, or similar Greywatch document in the Haunted Chamber (7) worth 2 Gold to an appropriate buyer.
- Two Valuable Caches: One cache containing 1d12 × 4 Silver hidden in the Storehouse (6) and another containing valuables worth 1d12 × 6 Silver concealed among the rubble of the Collapsed Gallery (5).
- Unusually Rich Expedition: A cache of 1d12 × 4 Silver in the Guardroom (2), cumbersome valuables worth 1d12 × 6 Silver in the Collapsed Gallery (5), and old coin or jewelry worth 1d12 × 5 Silver in the Lower Vault (8). The Lower Vault also contains an inscribed bronze seal connected to the deeper complex. The seal itself is worth 5 Gold as an antiquity, but its markings can also provide the basis for a future Contract.
Roll variable treasure amounts when the treasure is discovered or during adventure preparation. The listed value of jewelry, salvage, equipment, and historical objects represents what the object can reasonably be sold for under ordinary circumstances. Contract payment remains separate from hidden treasure, and completing a Mission never requires the characters to discover every valuable object in Greywatch.
Greywatch Dungeon — Keyed Locations
The following descriptions establish the physical reality of Greywatch. The Variable Rolls determine what 1d12 says about entrances, inhabitants, hazards, secret passages, and treasures that are actually present during a particular campaign. Do not add an encounter merely because a room description mentions the possibility of one.
Gate Chamber (1)
The main entrance opens into a broad stone chamber whose construction shows several periods of Greywatch’s history. Older fitted masonry survives beneath rougher repairs, while portions of the ceiling have collapsed near the outer wall. Broken benches, rotted timber, rusted hooks, scattered stone, and the remains of an old interior barricade suggest that generations of occupants repeatedly repaired and reused this room.
Tracks are particularly easy to notice here because nearly everything entering Greywatch through the ordinary route passes across the dusty floor. Careful examination can distinguish recent Human footwear, Goblin tracks, dragged objects, animal movement, or signs that somebody entered and later departed.
If 1d12 answers “What happened to Annie Johns?” saying that she’s located here, circumstances should be immediately discoverable through reasonable exploration rather than hidden behind another arbitrary Test. If 1d12 says “Traps & Hazards” include damaged masonry that’s actively unstable, characters who examine the walls, ceiling, debris, or old supports should have an opportunity to recognize the danger before deliberately disturbing it.
The main entrance is always usable. Interior passages lead east toward the central junction and the Guardroom (2). From that junction, passages continue north toward the Cistern (3) and south toward the Ossuary (4).
Guardroom (2)
This cramped chamber once controlled movement deeper into Greywatch. Stone benches line portions of the walls, rusted brackets mark where weapons once hung, and several wooden furnishings have survived only because later occupants dragged replacements inside. Anyone occupying the upper dungeon naturally gravitates toward this room because it overlooks the most convenient internal approaches.
When Goblins occupy the Guardroom (2), they use the existing clutter intelligently. Furniture may be shifted into partial cover, rubbish placed where intruders will make noise, and an escape route kept clear. Goblins who realize they are losing should behave according to their normal morale rather than remain here to die.
If 1d12 says “Traps & Hazards” may place a tripwire, deadfall, or concealed pit along the Guardroom (2) approaches. These should possess physical clues appropriate to the trap: disturbed dust, suspicious cord, recently moved debris, scrape marks, mismatched flooring, or an oddly unobstructed path.
A small recess, loose stone, abandoned box, or concealed space provides the possible location for the Silver cache listed under Hidden Treasure & Loot.
The western passage returns toward the Gate Chamber (1) and central junction. The eastern route continues normally toward the Storehouse (6).
Cistern (3)
An older underground water system occupies most of this chamber. A stone-lined cistern fills the center, fed by seepage and drainage from above. The water is dark but not inherently poisonous, although drinking untreated standing water from an ancient dungeon carries obvious risks. Narrow walking space surrounds portions of the reservoir, and damp stone makes careless movement more dangerous.
An old well shaft rises toward the surface. If the well entrance is usable, a rope, ladder, climbing equipment, magic, or another reasonable method allows passage between the ruins above and this chamber.
If Giant Spiders occupy the Cistern (3) they favor the upper stonework, well shaft, dark corners, and spaces above eye level. Their presence can be foreshadowed by webbing, drained vermin, strands across inaccessible surfaces, or unnatural silence.
If 1d12 says “Traps & Hazards” are present here, then the edge is especially hazardous through slippery footing or weakened stone. Falling into the water should create a problem rather than automatically kill a character.
Coins or other small valuables may have accumulated beneath loose masonry or fallen into a shallow ledge if 1d12 says there’s “Hidden Treasure or Loot” here.
A passage south returns to the central junction. The dungeon also contains a potential concealed passage eastward into the Haunted Chamber (7).
Ossuary (4)
This chamber predates the visible fortress. Niches, low stone platforms, and burial recesses contain old Human remains whose arrangement follows customs no longer practiced in Willowcreek. Later inhabitants disturbed some burials, but much of the chamber remains intact.
Skeleton Warriors, when present, should initially resemble ordinary remains. They need not animate the instant somebody enters. Disturbing graves, crossing a protected point, removing certain objects, or another appropriate trigger may awaken them according to the circumstances the GM establishes.
Characters examining the chamber can recognize that the burials are older than Greywatch’s upper works. Scholarship, knowledge of local cultures or religious traditions, Medicine, spiritual insight, or simple careful observation may reveal different pieces of that fact without requiring one specific Character Class. Several burials also appear unfinished or disturbed in ways that may be significant to someone accustomed to interpreting funerary practices, spirits, omens, or sacred customs.
If 1d12 says “Traps & Hazards” are present then there may be a concealed pit along the approach or an old stone door that’s dangerous to force.
If 1d12 says there’s “Hidden Treasure or Loot” here then the heroes may find burial jewelry here. Taking obvious grave goods may also influence how NPCs later react if their origin becomes known; treasure being available does not mean every character will regard taking it identically.
The northern passage returns toward the central junction. A potential secret route in the eastern masonry connects toward the Collapsed Gallery (5) if that route exists. The Burial Opening may provide direct exterior access.
Collapsed Gallery (5)
A long chamber once connected parts of the older complex, but major structural failure has transformed it into broken levels, rubble slopes, cracked flooring, half-buried architectural fragments, and narrow passages between fallen stone. This is the dungeon’s strongest environmental exploration area. Characters may climb over debris, squeeze through gaps, inspect unstable sections, move along surviving ledges, or search for safer paths rather than simply walking across a rectangular room. Giant Spiders favor the broken elevation, overhead cavities, and numerous approaches. Goblins using the Gallery may instead exploit rubble for concealment, missile positions, escape routes, or ambushes. The uneven terrain also makes retreat, pursuit, and carrying an injured companion more difficult, while clever characters may use loose stone, elevation, or narrow gaps to control how enemies can approach them.
If 1d12 says “Traps & Hazards” are present then portions of the remaining floor may be structurally unsound. Signs such as sagging supports, fresh cracks, shifted dust, or fallen fragments should permit cautious characters to identify danger. A collapse need not simply inflict injury; it may also block a route, separate characters, expose a buried opening, or leave someone stranded upon a different level of the chamber.
If 1d12 says there’s “Hidden Treasure or Loot” here then the GM may place cumbersome salvage here: carved stonework, old metal fittings, valuable architectural material, or another object worth money but inconvenient to remove.
A route north reaches the Storehouse (6). The Hillside Breach may open directly outside. The potential western secret passage leads into the Ossuary (4).
Storehouse (6)
The Storehouse (6) has been reused more frequently than almost any chamber below Greywatch. Shelves, barrels, crates, hooks, old tools, broken containers, and discarded equipment from several eras crowd the room. Most surviving goods are worthless through age, damp, rust, vermin, or decay, but the clutter makes the chamber an excellent place to search.
Goblins occupying Greywatch often use this room as their principal living and storage area. Evidence may include sleeping nests, stolen cookware, scavenged tools, bones from meals, crude repairs, small personal possessions, and objects taken from recent travelers. Such details should make the inhabitants feel as though they actually live here rather than materialize solely for combat. The clutter also creates numerous places to hide, overturn for cover, barricade a doorway, or conceal something valuable beneath apparently worthless debris.
If 1d12 says “Traps & Hazards” are present then place an old mechanical defense or trapped door here. Goblins may know about an ancient trap without having built it themselves. The place was looted long ago, but if 1d12 says there’s “Hidden Treasure or Loot” here then place equipment, documents, weapons, or hidden treasure in this chamber. A successful search should reveal objects according to where they are logically concealed rather than creating treasure from nowhere. Items associated with recent occupants should appear among their belongings, while older valuables may remain behind false panels, beneath collapsed shelving, inside sealed containers, or in places previous looters simply failed to notice.
The westward passage reaches the Guardroom (2). The southern route reaches the Collapsed Gallery (5). The northern passage ascends toward the Haunted Chamber (7). If available, the Drainage Culvert provides exterior access from the east.
Haunted Chamber (7)
This old chamber shows signs that its final purpose was neither storage nor ordinary defense. Scratches mark portions of the stone. One wall bears traces of something repeatedly removed, replaced, or struck. Broken furniture and scattered remnants suggest that people once spent considerable time here under unpleasant circumstances.
Even when no Poltergeist is present, the room should feel wrong because of its history, not because the GM must announce supernatural evil. Characters may notice cold pockets, inexplicable movement of dust, damaged objects, old stains, or evidence of violence whose exact story is no longer obvious.
When the Poltergeist is present, it is the bound Ruach of Hollis Vale, a young clerk who served Greywatch during its decline. Hollis discovered evidence that the final commander was keeping money intended for repairs and soldiers’ wages. He threatened to expose the theft, was beaten, confined in this chamber, and died there. His body was concealed behind a crudely repaired section of wall.
The Poltergeist initially reacts to intruders with suspicion rather than immediate murderous violence. Repeated disturbances, attempts to damage the concealed wall, theft of objects associated with Hollis, or apparent cooperation with symbols of the old commander may provoke stronger manifestations. Careful investigation can reveal the patched masonry, fragments of Hollis’s records, and enough of his story to understand what binds him here.
Recovering Hollis’s remains and giving them an honorable burial can release him. Restoring his name and exposing what happened to him may also calm the spirit enough for release, while appropriate supernatural rites may resolve the haunting according to their normal rules. Destroying or suppressing the Poltergeist remains possible, but it is not the only solution.
The chamber contains clues showing that Greywatch’s decline involved more than simple abandonment: neglect, fear, misuse of authority, or deliberate cruelty may all be suggested without providing a complete historical account. A southern passage descends to the Storehouse (6). An eastern route leads toward the Lower Vault (8). The potential western secret passage reaches the Cistern (3).
Lower Vault (8)
A flight of stone stairs descends into this chamber from the upper works of Greywatch. Once inside, the difference is unmistakable: the fitted masonry, surviving carvings, proportions, and construction style clearly predate the watch-post above. Whatever Greywatch became later, this room belonged to something older. The Lower Vault (8) should feel like a destination without becoming the final room of the complex. If 1d12 says “Traps & Hazards” are present then the descending stairs may be dangerously unstable. The Mission Variables for Mission Two may make reaching, surveying, recovering something from, or securing this chamber the objective.
At the far side of the room stands a massive ancient door leading deeper underground. The characters may inspect it, study its construction, search for mechanisms, inscriptions, keys, or other means of opening it, but the door cannot actually be opened until the Game Master has prepared the map and details for Lower Level 1. What lies beyond it is not detailed in this appendix, and is solely up to the imagination of the Game Master. Until then, every attempt ultimately reveals that some necessary method, mechanism, condition, or understanding is still missing. The GM may admit to the players that the door is impossible to open because the next floor isn’t designed yet, so they don’t waste time. Otherwise, player characters should be permitted to descend as far into the dungeon as their abilities, resources and completed maps allow.
Mission One — Someone Didn’t Come Home
This is intended as a short first Contract for ⭐Level 0 adventurers. Its purpose is simple: somebody went into Greywatch, and somebody has to go after her. The party is not being asked to clear the dungeon, destroy every creature inside, discover its history, or reach the Lower Vault. Their objective is to find Annie Johns and bring her home if she is still alive.
The Contract
Joanna Johns is a single mother who has struggled to keep her household afloat through a difficult year. She earns money as a hired wagon driver through the Mud Hen Livery while raising her five-year-old daughter Annie, a small redheaded girl with a bright, friendly personality. Annie disappeared while playing near home. Witnesses remember seeing strangers near the road shortly beforehand, and signs discovered afterward suggest she was carried away toward Greywatch. Joanna has managed to raise 6 Silver as payment to the entire adventuring party, partly from her own savings and partly from neighbors who know Annie. It is not a rich Contract, which is one reason experienced adventurers at Rusty’s have not rushed to claim it. Joanna does not need famous heroes. She needs people willing to bring her daughter home.
What Joanna Knows
A scrap of Annie’s clothing and several tracks were found along the road leading toward Greywatch. A farmer later reported seeing three or four small figures moving through the brush in that direction with a struggling child between them. He was too far away to identify the figures clearly, but the child appeared to have bright red hair. Joanna does not know who took Annie, why she was taken, or whether her captors remain in Greywatch. She knows only that her daughter did not wander there voluntarily and that every hour matters.
Running the Mission
Before play, use the result already rolled on 1d12 — Mission One: What Happened to Annie Johns? That result determines where Annie is found and what immediate problem prevents her from simply walking home. The route should require only one to five room locations. Do not enlarge the Mission merely because more dungeon exists beyond Annie. Tracks, a dropped possession, disturbed dust, blood, damaged equipment, webbing, Goblin signs, or sounds from deeper inside can point the party toward her according to the rolled circumstances. There is no required combat. Goblins may flee, bargain, threaten, hide, or fight. A Spider may be absent when the heroes first find its victim. A collapse may demand physical work rather than violence. Annie may require Medicine, assistance walking, improvised carrying, climbing equipment, or protection during the retreat. Whatever occurs, Greywatch should reveal more than the party came to find. A character may notice an old stairway, a sealed passage, ancient masonry, unexplained tracks, a secret route, or evidence that the visible ruins conceal a much larger underground complex. The players should leave knowing that they solved today’s problem without solving Greywatch.
Completion
The Contract is successfully completed when Annie is returned alive to Willowcreek. Joanna will be openly emotional and grateful. The party went into danger because a family without wealth or influence asked them to bring home someone they loved. Because this is the characters’ First Mission, successful completion is worth 3 ⭐XP, regardless of its short length. Characters who complete the Mission while remaining on the side of good also earn the ordinary +1 🕊Favor.
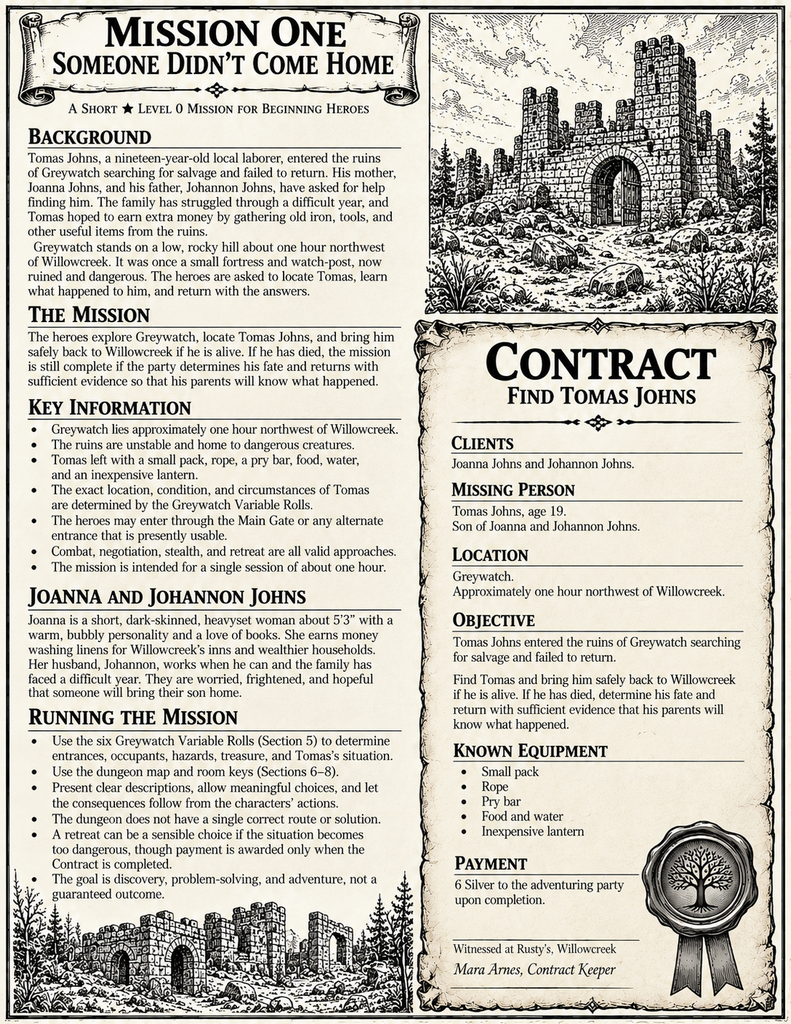
Mission Two — Return to Greywatch
This Mission is intended for ⭐Level 1 adventurers who have already completed their first genuine adventure. Greywatch is no longer entirely unknown to them. They may know one entrance, several rooms, signs of particular inhabitants, and perhaps one or two dangers. They may not have even encountered combat yet in rescuing Annie. That familiarity should matter, but it should never make the second expedition predictable.
Use the Greywatch state already established by rolling Mission Variables. Do not reroll the dungeon simply because another Mission has begun. Instead, account for what happened during Mission One. A Goblin killed during the rescue remains dead. A discovered entrance remains known. A sprung trap may remain broken. An inhabitant that escaped may have moved. Treasure already taken is gone. Greywatch is a persistent place rather than a collection of encounters that resets between adventures.
Mission Two Variables
Roll 1d12 to select Recovery (1–4), Rescue or Locate (5–8), or Room Clearing (9–12); roll separately for each bracketed detail. The appropriate employer posts the Contract through Rusty’s, where Mara Arnes records the agreement. A private owner or antiquarian may commission recovery work. A family member or employer may seek a missing person. Reeve Bennet Sticklen may commission investigation or security work when Greywatch has become a public concern. Unless a particular result requires different terms, the suggested payment is 2 Gold to the adventuring party upon successful completion. Ordinary abandoned property and unclaimed treasure may be kept unless the Contract identifies something as Reserved Property.
Recovery — Results 1–4
The party must recover a specific object: [1][2][3] a strongbox, [4][5][6] property records, [7][8][9] remains and belongings, or [10][11][12] a historical object. Place the objective somewhere that makes physical sense and requires meaningful exploration. The [1][2][3] Storehouse (6), [4][5][6] Ossuary (4), [7][8][9] Haunted Chamber (7), and [10][11][12] Lower Vault (8) are particularly suitable, but the GM may use another location when the established dungeon state suggests a better answer. Do not place the objective behind a secret route unless that route actually exists during this version of Greywatch. The object should create a practical problem rather than merely occupying an inventory line. A strongbox may be heavy. Records may be especially hard to find. Human remains may require respectful transportation. A historical object may be difficult to identify among worthless debris. The Mission is complete when the named Reserved Property is returned to the employer.
Rescue or Locate — Results 5–8
Someone else entered Greywatch and failed to return: [1][2][3] an adventurous antiquarian, [4][5][6] laborers, [7][8][9] a thief, or [10][11][12] a young explorer. Unlike Mission One, the missing person need not be waiting conveniently near the entrance. Place the subject according to the current occupants and hazards. [1][2][3] They may be treasure hunting and unaware that Skeleton Warriors can awaken. [4][5][6] The person or group may have become trapped by a collapse. [7][8][9] The person may be hiding from Goblins after stealing something from them. [10][11][12] The person could have used an alternate entrance and become unable to retrace the route. The person may be [1][2] frightened, [3][4] dishonest, [5][6] annoyingly stubborn and unwilling to cooperate, [7][8] guilty of some crime, injured [9][10], or [11][12] unwilling to leave without something he came to find. Finding someone and persuading or physically enabling him to return can be separate problems. The Mission is complete when the party fulfills the exact Contract: rescue the subject, establish his fate, or return whatever proof or information the employer required.
Room Clearing — Results 9–12
The employer wants hostile creatures removed from Greywatch through direct force. The principal threat is [1][2][3] a Goblin band, [4][5][6] one or more Giant Spiders, [7][8][9] awakened Skeleton Warriors, or [10][11][12] a cult of Commoners led by a Dark Priest. The objective is to kill or drive out every member of the designated threat on the Upper Level.
The enemy response is [1][2] an immediate defense of its position, [3][4] an ambush prepared after signs of the party are detected, [5][6] a fighting withdrawal toward another occupied room, [7][8] a counterattack after the heroes believe the area is secure, [9][10] several separated fights as creatures defend different positions, or [11][12] a concentrated confrontation in which most surviving hostile occupants gather for one decisive battle.
The principal fighting is centered upon [1][2][3] the Guardroom (2), [4][5][6] the Cistern (3) or Collapsed Gallery (5), [7][8][9] the Storehouse and surrounding passages, or [10][11][12] the approach to the Lower Vault (8).
Use what 1d12 established about “Current Occupants” in addition to the enemies determined in these variables. The Mission is complete when the designated hostile force has been killed or driven from the Upper Level of Greywatch. Creatures that successfully escape into deeper levels do not prevent mission completion.
Running the Mission
Allow the players to decide how they approach Greywatch. They may return through the Main Gate, investigate an alternate entrance they discovered previously, purchase additional equipment in Willowcreek, seek information, or approach the ruins cautiously before entering.
Once underground, present the dungeon according to its established state. Do not force the party through every room. A secret passage, negotiation, clever climb, magical solution, or remembered route may allow them to bypass substantial danger. Conversely, curiosity may lead them into rooms unrelated to the Contract.
The inhabitants should react to intrusion. Goblins may withdraw, reinforce a position, attempt an ambush, negotiate, or exploit a route the characters have not discovered. A Giant Spider hunts rather than guards treasure. Skeleton Warriors follow whatever triggers animate them. A Poltergeist has circumstances binding it to Haunted Chamber (7) rather than existing simply as another opponent.
The Mission should naturally create opportunities for many kinds of adventurers: combat, stealth, climbing, tracking, negotiation, investigation, medicine, magical analysis, spiritual confrontation, mechanical work, physical labor, archery, protecting companions, and making decisions when the safest route conflicts with the most profitable one. No particular Character Class is required.
Completion and Rewards
The party succeeds when it satisfies the completion condition of the rolled Contract and returns to Willowcreek with whatever person, object, information, or secured result was required. Mission Two awards 1 ⭐XP upon successful completion. A character who remained on the side of good during the Mission also earns +1 🕊Favor, up to the normal maximum.
By the end of this expedition, the players should understand that Greywatch is not a single adventure. It is a place they now know well enough to fear intelligently—and one that still descends beyond the map.
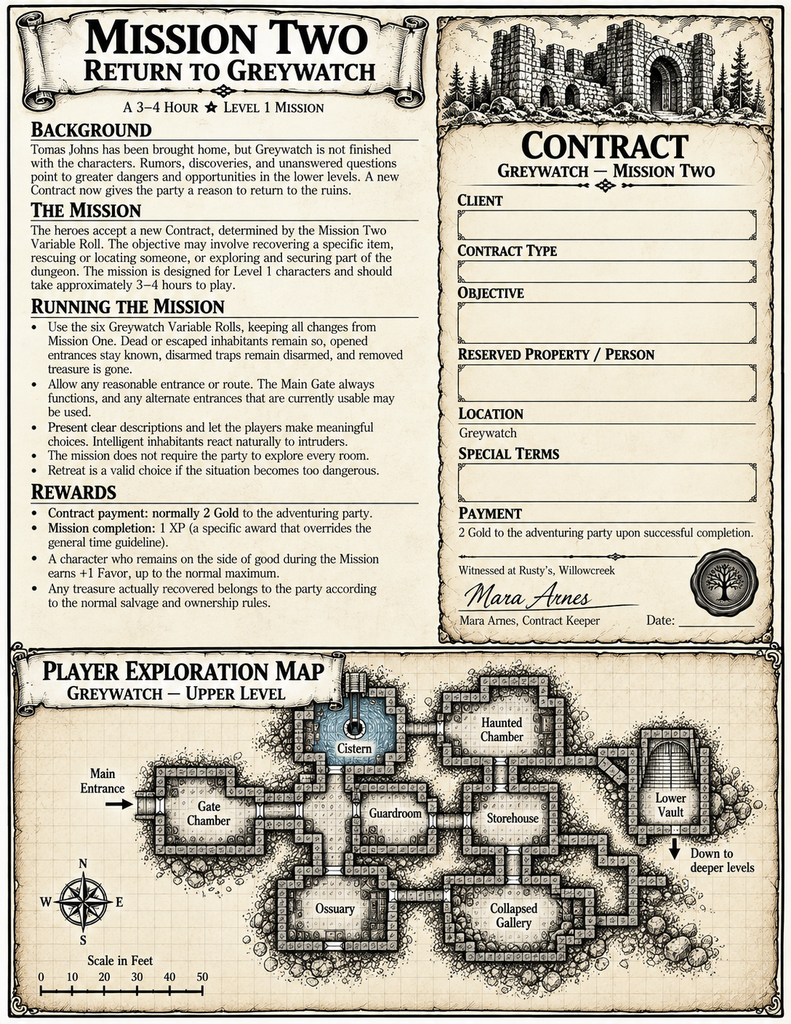
Outcomes & Consequences
Greywatch does not have one correct ending. The Mission ends when the party fulfills the Contract, decides it cannot safely continue, or creates a new situation for later.
Rescue & Withdrawal
The party completes the objective and leaves Greywatch largely as it found it. Hostile creatures, unexplored rooms, secret passages, and the descent below the Lower Vault may remain. Willowcreek now knows Greywatch is dangerous but accessible, making future Contracts concerning the ruins more likely.
Upper Vaults Secured
The party removes, drives away, neutralizes, or otherwise resolves the dangers blocking ordinary access through part of the upper dungeon. This does not require exterminating every creature. Workers, scavengers, scholars, or the town watch may later enter those areas, changing Greywatch when the characters return.
An Agreement
The adventurers reach an understanding with intelligent inhabitants. Goblins may agree to avoid a route, release captives, exchange information, or withdraw from the upper chambers. Such agreements remain only as reliable as those involved. In Kingsmark, goblins are 100% evil and prone to betrayal. An agreement with them may cause Willowcreek residents to regard the characters as clever, suspicious, cowardly, undeniably stupid, or pathetically weak but practical, depending upon who learns the details.
Something Restored
The characters discover that a problem can be resolved rather than destroyed. Remains may be laid to rest, stolen property returned, a trapped spirit released, or part of Greywatch repaired sufficiently to end a continuing danger. A place associated with fear may become safer because the party understood what was wrong.
Something Released
The adventurers open a sealed route, disturb an old mechanism, awaken something dormant, remove an object serving an unknown purpose, or otherwise change Greywatch unexpectedly. The Mission may still be a success; the consequence simply becomes part of the campaign.
The Deeper Mystery
The party completes its objective but discovers convincing evidence that the mapped dungeon is only the uppermost portion of a much larger complex. They may find stairs descending into darkness, air moving through a sealed doorway, markings from unknown builders, sounds from below, or evidence that something large once used inaccessible passages. Greywatch becomes a place the characters can choose to revisit rather than a problem the Game Master must force upon them. After any outcome, decide what Willowcreek learns. News may increase confidence in the party, create fear, attract treasure seekers, produce new Contracts, or cause officials to restrict access. Consequences should follow naturally from what the characters report and what others can independently discover.
Treasure, Payment & Rewards
Greywatch should reward exploration without making every room a container waiting to be emptied. Contract payment, salvage, hidden treasure, useful equipment, and information are separate forms of reward.
Mission Two normally pays 2 Gold to the adventuring party as a whole unless the chosen Contract or employer establishes different terms. This is meaningful money for inexperienced adventurers without making one local expedition financially transformative. Ordinary abandoned property and unclaimed treasure may be kept unless the Contract identifies Reserved Property or ownership is otherwise obvious.
Use the Hidden Treasure & Discoveries Variable Roll to determine how much additional value exists. A modest Silver cache might represent forgotten wages, emergency money, or scavenged coin. Jewelry in the Ossuary may be valuable but morally or legally complicated. Equipment found in the Storehouse may be more useful than its resale value. Cumbersome salvage may require ropes, labor, carts, or a later expedition before anyone can profit from it.
Historical objects should sometimes create choices instead of immediate prices. A document may establish an old property claim. A seal may identify one of Greywatch’s former commanders. An inscription may interest a scholar. A strange mechanism may be worth more intact than broken apart for metal. The Game Master does not need to reveal an exact monetary value until someone actually attempts to sell, appraise, or use the discovery.
Beyond Greywatch
The following hooks deliberately point toward adventures that are not developed in this appendix. They give the Game Master reasons to reuse Greywatch, Willowcreek, and creatures from Appendix B without prescribing what happens next.
Orcs Below
Fresh tracks appear near a route the characters believed was sealed. They are larger and more disciplined than Goblin tracks, and somebody has marked several walls with signs that appear to organize movement through the lower ruins. An Orc scouting party may have found Greywatch from below before Willowcreek found it from above.
The Ogre’s Toll
Travelers begin reporting a huge creature near an old drainage route beyond the ruins. An Ogre has occupied a chamber somewhere beneath Greywatch and has discovered that frightened Goblins will bring it food, stolen property, and information in exchange for being left alone.
The Name in the Tomb
An inscription recovered from the Ossuary names a person whose burial chamber should lie somewhere deeper. Soon afterward, several witnesses independently describe seeing a pale figure near Greywatch at night. Whether the figure is a Wraith, something else, or merely someone using the legend is for the Game Master to decide.
Someone Wants It Back
An object recovered during Mission Two attracts attention. An Assassin arrives in Willowcreek asking careful questions about who entered Greywatch, what was found, and where the party is staying. The object may be valuable, incriminating, sacred, stolen, or important for reasons the adventurers do not yet understand.
The Buyer of Ruins
A wealthy stranger begins purchasing old Greywatch maps, artifacts, accounts, and salvage through intermediaries. The buyer may be an Evil Sorcerer, Dark Priest, collector, scholar, or agent of someone else. What matters is that somebody with resources suddenly values information the party previously considered worthless.
The Door Made for Something Else
Beyond the Lower Vault stands a sealed doorway far larger than any Human requires. Deep scratches scar the stone around it. Heat damage marks one side of the passage. Whether these signs eventually lead to a Dragon, an older structure, or something entirely different is left to the Game Master.
Game Master Tips
Before Play
Roll the Mission Variables and record the results. Mark which alternate entrances and secret passages are active. Note current occupants, active hazards, treasure locations, and the Mission objective. Review only the Appendix B “Bestiary” entries likely to appear. If Mission One has already been played, update the dungeon to reflect everything the characters changed.
Do not prepare Greywatch as though the characters must experience every room, creature, trap, or discovery. Mission Variables establish the situation that exists when the expedition begins; the players determine which parts of that situation become important. A creature placed in a room may never be encountered. A secret passage may remain undiscovered. Treasure may be left behind. That is not wasted preparation—it is part of having a location that exists independently of the characters.
Prepare only the player handouts presently justified by the story. The Willowcreek map and location reference may be available when the campaign begins. Give the appropriate Contract handout when the party accepts that Contract. The Greywatch Map should be given only when the characters obtain, borrow, purchase, or create such a map. A historical floor plan, survey, or military document found in the Storehouse (6) may likewise become a handout when the appropriate discovery occurs. A handout never reveals current occupants, traps, treasure locations, or whether a possible secret route is presently usable.
Before beginning, understand the immediate situation rather than trying to memorize the entire dungeon. Know why the characters are going to Greywatch, what currently lives there, where obvious routes lead, and what might happen if the characters make noise, retreat, wait for several hours, or approach from an unexpected direction. The keyed locations can supply the rest when needed.
During Play
Use the keyed rooms as places, not scripts. Describe what is physically present and allow the players to decide where they go and how they interact with it. Do not move an encounter merely because the characters avoided the room where it was located. Do not require a particular Skill, Character Class, route, or solution when another approach reasonably works.
When players attempt something not anticipated by the text, begin with the fictional situation. Decide whether what they propose is physically possible, whether success is uncertain and consequential, and whether a Test is actually necessary. If a clever idea would simply work, allow it to work. If uncertainty matters, use the appropriate Kingsmark rule and Target Number rather than inventing an obstacle solely because the players found an unexpected solution.
Remember that information is part of play. Tracks, sounds, disturbed debris, webbing, smoke, footprints, broken doors, abandoned equipment, frightened animals, old writing, and changes in air or temperature can warn observant characters without announcing exactly what lies ahead. Good clues create decisions. They may tell the players that something dangerous passed through without identifying it, reveal that a room has recently been occupied without explaining by whom, or suggest another route without guaranteeing that it is safe.
Greywatch is dangerous, but danger should make decisions meaningful rather than arbitrary. Traps should have physical causes. Creatures should behave according to their nature, intelligence, knowledge, and immediate circumstances. A Goblin that hears fighting nearby may investigate, hide, flee, prepare an ambush, or warn companions rather than remaining motionless because its keyed location says where it began. Retreat should remain possible when the fiction allows it.
Keep track of meaningful changes as they occur. If the party collapses a passage, leaves a door open, kills several Goblins and allows another to escape, makes an agreement, abandons equipment, or creates enough noise to alert nearby occupants, note it. Greywatch should gradually become the particular Greywatch created by this campaign rather than returning to its starting condition between Scenes.
The Twelve Horrors
Greywatch introduces characters to several of the Twelve Horrors without requiring every expedition to become a catalogue of psychological suffering. The Game Master should call for Mental Trauma only when something the character actually experiences is sufficiently horrifying, revolting, devastating, or overwhelming to justify it; the mere existence of a dangerous room or monster does not automatically require a Test.
The Horror most likely to appear is 👻 The Supernatural and Unnatural. A character encountering an animated Skeleton Warrior or witnessing the Poltergeist manifest may be confronting the supernatural directly for the first time; the first sight of undead or another unnatural entity may therefore threaten Mental Trauma.
🪦 Sorrow of Death may arise when characters witness companions, enemies, or other people die, particularly when death is sudden, helpless, or gruesome. 🤢 Contamination and Revulsion may become relevant among decaying remains, webs, vermin, flooded chambers, or especially revolting conditions. 🔒 Isolation, Abandonment, and Imprisonment may arise if a character becomes trapped, separated, webbed, buried behind a collapse, or otherwise unable to reach companions or escape.
Several other Horrors depend upon what happens during play rather than upon Greywatch itself. 🧸 Death of the Innocent could apply if Annie or another innocent person is killed. 🪞 Guilt and Self-Betrayal may become appropriate if a character’s choices or failures produce consequences he believes he should have prevented. 👁️ Torture and Mutilation (Witnessed) may apply if the characters encounter genuinely mutilated victims or especially horrific remains rather than ordinary battlefield casualties.
Do not roll merely because a category can technically be connected to an event. Consider what the character actually witnessed, how severe it was, and whether it exceeds the ordinary dangers of adventuring. Likewise, do not repeatedly test the same character for one continuous horrifying event merely because several minutes or Combat Rounds have passed. A new manifestation, revelation, death, or meaningful escalation may justify another traumatic event; simply remaining in the same frightening room does not.
The remaining Horrors are not inherent to Greywatch’s upper levels. Do not manufacture them merely to make the dungeon more disturbing. If the characters’ actions, discoveries, or future expeditions create such situations, apply the Twelve Horrors normally. Repeated encounters matter: surviving the same category of Horror can eventually harden a character, while severe Trauma can instead leave a permanent psychological wound.
After Play
Record what changed. Note dead, escaped, allied, or displaced NPCs; discovered entrances; opened secret passages; sprung or dismantled traps; removed treasure; repaired or collapsed structures; and anything released or disturbed. Record what the characters told Willowcreek and what other people are likely to learn independently.
Also consider what happens because time passes. Survivors may relocate. Goblins may learn that companions disappeared. Scavengers may enter an area the characters cleared. Someone in Willowcreek may hear about recovered treasure. A newly revealed entrance may attract explorers, criminals, scholars, or officials. Do not force such developments merely to create complications, but allow obvious consequences to occur.
Do not reset Greywatch.
The next time the adventurers return, they should enter the same place carrying the consequences of their previous decisions with them. Even an expedition that lasted only a few hours can permanently alter who occupies the ruins, what routes remain usable, what Willowcreek believes about the site, and what new Contracts become possible.
The Adventure Continues
Greywatch is only the beginning.
Beyond Willowcreek lie creatures threatening the people of the Kingdom of Aldren and the neighboring kingdoms, peoples, and allies who share its world. Adventurers may hunt monsters, investigate ancient ruins, cross dangerous wilderness, uncover lost civilizations, enter foreign courts, sail distant seas, and eventually explore all seven continents of Sylva. 🧭The World Book: A Complete Guide to the Medieval Fantasy World of Sylva expands the official setting with its geography, history, kingdoms, peoples, cultures, religions, factions, wilderness, legendary places, and lore.
🍺The Tavern: The Game Master’s Guide to Heroic Fantasy Adventure carries the Game Master much farther. It is not merely advice for people who already know how to run role-playing games. It teaches beginning Game Masters how to prepare situations, adjudicate unexpected player choices, create Contracts and dungeons, build continuing campaigns, and turn randomly generated circumstances into playable Missions using Kingsmark’s own adventure-generation procedures.
Those adventures grow with the heroes. A party may begin by protecting travelers, exploring ruins, rescuing captives, and hunting creatures near home. Later they may organize expeditions, confront threats affecting entire regions, purchase or build a castle, govern or defend territory, become involved in warfare, lead or participate in enormous battles, or even invade another country. The Tavern explains how such events can become actual adventures—with objectives, opposition, decisions, consequences, and rules—rather than events the Game Master merely narrates around the characters. Large battles, territorial campaigns, and similar situations naturally become increasingly important toward the end of an adventuring career.
🧭The World Book provides the larger stage. The Kingdom of Aldren is only one part of Sylva. Beyond its borders are other kingdoms, peoples, wildernesses, seas, civilizations, religions, ruins, conflicts, and mysteries spread across seven continents. Characters who began their careers taking Contracts at Rusty’s may eventually find themselves very far from Willowcreek confronting dangers they could scarcely have imagined when they accepted their first Mission. Greywatch teaches the beginning of an adventuring career. The Tavern teaches the Game Master how to keep creating what comes next. The World Book provides an entire world in which to do it.
Sandbox
Kingsmark is not intended to have an official metaplot that dictates what happens next in every campaign. There are established elements that make a game feel like 👑Kingsmark—the world of Sylva, its kingdoms and peoples, the rules of ⭐Jack’s Cinematic d12, the Twelve Horrors, Contracts, 🕊Favor, the 🪱Gloom, the cultures and creatures of the setting, and the assumptions established throughout the core books—but none of these exist to prevent the Game Master from creating something new.
Game Masters are encouraged to invent towns, kingdoms, ruins, religions, monsters, political conflicts, secret societies, ancient civilizations, wilderness regions, magical traditions, and entire campaigns. Official material should provide foundations, examples, tools, and inspiration rather than become a cage. If your version of Sylva develops differently from another group’s version, that is not a mistake. Once play begins, your table creates its own history.
Kingsmark is also intended to remain accessible regardless of a player’s finances. The six core books provide the fullest organized presentation of the game, but nobody should be excluded from playing because they cannot afford an entire shelf of rulebooks. Kingsmark has always intended to make its content available free in some digital form, including webpages at Kingsmark.games, while printed books and professionally produced editions remain available for players who want them.
Players are also explicitly encouraged to share all official Kingsmark digital content with friends, gaming groups, archives, and file-sharing networks. All official Kingsmark digital books, images, videos and audio files are authorized for free distribution. Therefore, sharing a digital book, image, video or audio file is not piracy against Kingsmark—it is participation in the game’s distribution. That permission extends to torrents and file-sharing platforms, including services such as The Pirate Bay.
Buy the books if you can, but most importantly, play the game, introduce others to it, and enjoy heroic fantasy tabletop role-playing at its very best.